

How To Finish The Inside Of A Skylight
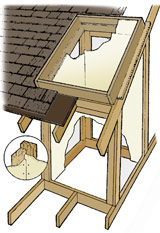
FIG. 4 -A skylight framing assembly consists of the roof opening, the light shaft and the ceiling opening.
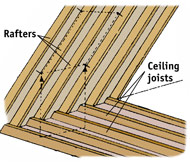
FIG. 5 - Locate the corners of the ceiling opening closest to the outside wall, and then utilize a plumb bob to find the location of the roof opening.
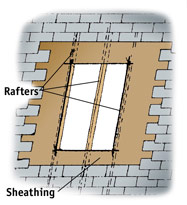
FIG. six - Drive nails up through the roof to mark the corners of the rough opening, then strip away the shingles and cut the sheathing with a circular saw.
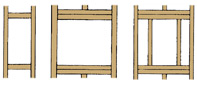
FIG. vii - If your skylight will fit betwixt existing rafters, you'll just need a single header (left). If you take to cut a rafter, utilise double headers (center). If the skylight volition exist placed in line with a rafter, use double headers and fill in the opening with trimmer rafters (correct).
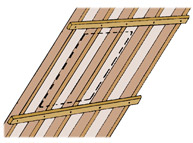
FIG. eight - Before cutting the rafter, boom temporary supports across the adjoining rafters to go along the roof from sagging.

FRAMING THE Rough OPENING
- A skylight framing assembly consists of three parts (Fig. iv):
- The roof opening is framed with headers–framing lumber run horizontally across the opening, securely nailed to the rafters to support the structure. Headers are cut from lumber the same size as the rafters.
- A curb-mounted skylight also requires a framed adjourn, typically 2x6s simply ordinarily specified by the skylight manufacturer (the frame has to project far enough to adjust the flashing). The curb is attack the roof sheathing effectually the perimeter of the opening, and the skylight is assail the curb.
- The ceiling opening is framed in the aforementioned way equally the roof opening–headers are nailed between the ceiling joists to back up the existing framing. Ceiling headers should be the same size as the ceiling joists.
- The light shaft is the framing that connects the roof opening with the ceiling opening. Information technology is typically framed with 2x4s, insulated like any interior wall and finished on the inside with drywall or other material. The low-cal shaft may be vertical or flared–wider at the bottom than the top. A flared light shaft is a niggling more than difficult to frame but will acknowledge more light.
- To frame the opening for a skylight, first decide on the approximate location of your skylight. It should be roughly centered in the room.
- Next, locate the ceiling joists, then realign the opening and so information technology fits between the joists. Depending on the size of your skylight, you may or may non have to cutting the ceiling joists and rafters; many skylights are made to fit between xvi" or 24" on center joists and rafters without removing any framing.
- Marking the two corners of the ceiling opening closest to the outside wall. Take care to make sure the points are parallel to the wall. The width of the ceiling opening should match the rough opening width of the skylight (specified by the manufacturer). The length will vary, depending on the type of low-cal shaft yous want.
- Drill small holes through the ceiling at your marks and push two pieces of stiff wire upward into the attic so yous can easily spot the location from above.
- Go up to the attic; if possible, bring a two' by 4' slice of plywood with you to lay beyond the ceiling joists so you won't accidentally put a foot through the ceiling. Locate your corners and clear the insulation away from the surface area. If you have to reroute electric wiring, always turn the power off first and double check by testing a fixture on that excursion with an electrical tester.
- Use a plumb bob to locate the ii points on the underside of the roof that are directly above the lower corners of the ceiling opening. Marker those points on the roof (Fig. 5). Double check to make sure they match the right rough opening width, and then measure up the underside of the roof the specified crude opening length. Drive 4 nails upward through the roof to marker the corners of your rough opening.
- Go upwardly to the roof and remove the shingles from around the opening, far enough to allow room to install the flashing. Snap chalk lines between the nails, and so cutting away the roofing felt with a utility knife.
- Fix your circular saw so the blade depth is slightly more than the thickness of the roof sheathing, then cut away the sheathing and remove it (Fig. six).
- How y'all frame the opening depends on the size and position of your skylight. If the skylight will fit between two existing rafters without cutting, only cut two headers to fit between the rafters (they should be the same fabric equally the rafters, typically 2x6s) and nail them in place with 16d common nails, affluent with the cut edges of the sheathing (Fig. 7).
- If you have to cut a rafter, framing is a little more than circuitous. First, nail two 2x4s across the rafters to provide temporary support (Fig. eight). The 2x4s should be long plenty to accomplish at least two rafters on each side of the i that will be cut.
- Then use a reciprocating saw to cut the rafter out of the opening 3" back from the edge of the sheathing on each side. Cut 4 headers to span the altitude between the uncut rafters on each side of the opening. Nail the starting time pair flush confronting the two ends of the cut rafter. Use three 16d common nails through the existing rafters into the headers on each terminate and three more nails through the header into the terminate of the cut rafter.
- Then nail the second pair of headers in place. Apply 16d nails to nail through the existing rafters into the ends of the header and a pair of 8d nails every 16" to blast the two headers together.
Source: https://www.millardlumber.com/HowTo/skylights/skylight.htm
0 Response to "How To Finish The Inside Of A Skylight"
Post a Comment